Monday, November 19, 2012

Thanksgiving Dishes with Country Crock {Recipe}


I adore Thanksgiving because it gives me an excuse to try new recipes. My favorite recipes to try out at Thanksgiving time usually revolve around 2 of my favorite dishes: potatoes and desserts.

For these recipes that I’m going to share with you today I was asked to swap butter and use a Unilever spread instead. I chose Country Crock, and I was super pleased with the results. You’ll also be happy to know that the recipes were tested on a 13-year old boy and a 30 year old guy and they both LOVED recipes.

Because they’re that good!

First up is a super easy potato side dish that is sure to please! The end result looks fancy, but I swear it doesn’t require a ton of effort.

Cheesy Hasselback Potatoes: Serves 4

Adapted from FoodNetwork.com

Ingredients:

  1. 4, 4-5 oz. potatoes (weight is before they’re peeled)
  2. 3 oz. of cheese (1.5 ounces per cheese type, grated) I used gruyere and white Vermont cheddar
  3. 1/2 cup of Country Crock Spread (melted)
  4. Salt/Pepper to Taste
  5. Bowl of water with dash of lemon juice

Steps:

1. Pre-heat your oven to 425-degrees. Rinse and peel potatoes, then soak in water with lemon juice. This keeps them from browning.

2. Once all your potatoes are peeled, thinly slice each potato about 3/4 of the way through in 1/4 inch slices like this:

I am so not a chef and my knife skills are not fab by any means, so just do your best!

3. Get your 1/2 cup of Country Crock Spread and melt it in a bowl large enough to fit your potatoes. I microwaved the Country Crock for about 30 seconds. Add a dash of salt and pepper and dunk each potato in the melted Country Crock mixture. Make sure all that yummy goodness gets into the potato layers. Reserve remaining melted Country Crock for later.

4. Pop your potatoes in the oven for about 35-40 minutes. Take them and sprinkle generously with your grated cheese and drizzle remaining melted Country Crock onto the tops of potatoes. Cook for another 15 minutes, or until fork tender and cooked all the way. Cool about 5 minutes, then serve! You end up with these wonderful potatoes that are slightly crispy on the outside, yet ooey and gooey on the inside.

So, now that you got your potatoes, you want dessert right? These 2-bite white chocolate pumpkin snickerdoodles will do the trick. Now I call these 2-bite snickerdoodles because they don’t flatten—they stay bon bon shaped! They’re dense, but have a lot of flavor and are great bite sized treats!

This recipe is also so easy that you can definitely get the kiddos involved. Look at the look of pure joy on my 13 year old brother’s face. Love that guy!

White Chocolate Pumpkin Snickerdoodle Bites: Makes 5-6 Dozen

Adapted from Six Sisters Stuff

Ingredients:

  1. 1/2 cup Country Crock Spread
  2. 1/2 cup shortening
  3. 1 cup white sugar
  4. 1/2 cup light brown sugar
  5. 3/4 cup unsweetened pumpkin puree
  6. 1 large egg
  7. 3 1/4 cup of flour
  8. 2 tsp of baking power
  9. 1 tsp of baking soda
  10. 1 cup white chocolate chips
  11. 1/2 tsp salt
  12. 1/2 tsp cinnamon
  13. 1/2 tsp of pumpkin pie spice

Topping:

  1. Cinnamon + sugar mixture (optional)

Steps:

1. Pre-heat your oven to 400 degrees. Mix together the margarine, shortening, sugars, pumpkin, and egg. I used my KitchenAid mixer, but you could also use your hand mixer or some elbow grease. Make sure to use a large bowl though because there’s lots of dough made from this recipe (which can easily be halved).

2. Once those ingredients are mixed, incorporate remaining ingredients (flour, baking powder, baking soda, salt, cinnamon, pumpkin pie spice, and white chocolate chips). REALLY mix it well! You don’t want to end up with cookies that have a flour aftertaste, so make sure to really work all the ingredients together well.

3. Put your dough in the freezer for about 10 minutes. This makes it easier to work with, especially if you’re using a cookie scoop, like I did.

4. Once your dough is chilled, use a cookie scoop or your hands to form into little balls. If desired, roll them into a cinnamon sugar mixture to coat. I did this on about half of my cookies, and I do think it helped amp up the flavor a bit, but you can omit this step.

5. Bake for about 8-10 minutes. They likely will not flatten, so don’t fret! Pumpkin puffs them up, but they’re still tasty. Unlike other cookies, I feel like these taste even better the day after. Once they’re out of the oven, let them cool and enjoy!

I didn’t taste or notice any difference when omitting the butter in favor of using Country Crock Spread by Unilever. It’s nice to know I can easily make that swap without sacrificing flavor. Now I know my Thanksgiving dinner will go off without a hitch!

What dishes could you use Country Crock Spread in this Thanksgiving?

Thank you to Good to Know & Unilever Spreads for being a sponsor. I was selected for this opportunity as a member of Clever Girls Collective. All opinions expressed here are my own.

0 comments:

Sunday, November 18, 2012

Holiday Celebrations #HolidayGuide {Entertaining}

I love, love, love the holidays, but trying to select gifts or plan menus for holiday soirees can be overwhelming. And daunting.

Which is why I love it when other people put together guides for me to pick and choose things from that are of good quality and value.

As a member of Social Fabric, I am excited to promote the Holiday Celebrations 2012 eguide created by Party Bluprints Inc. & Collective Bias.

image

The eguide contains fabulous recipes, like the Merry Mocktail pictured above (recipe on page 5) or the candied snickerdoodles seen below.

image

And while I love to have friends and family over during the holidays, preparing food and a menu really stresses me out. I always start off very ambitious, and then I give up and use something store bought and add a twist to it. I’ll be writing more about Tyson Bruschetta and how I incorporate this tasty new product into my party and snack rotation. It’s easy, affordable and tasty! Gotta love Any’tizers.

image

But besides entertaining, I also love to decorate my home, and this eguide offers a few ideas on how to DIY some décor.

image

And some fashion advice to make sure you dazzle at all those holiday gatherings:

image

I understand we’re all on a budget during the holidays, so make sure to flip through the 22-page eguide for some great savings from brands like Sears. This is a great way to save on holiday gifts for those fashionistas in your life.

image

The Holiday Celebrations 2012 eguide is a practical, fun, and easy way to get some ideas for holiday gifts, recipes and beauty/fashion ideas. Come back to my blog tomorrow to see 2 super easy Thanksgiving day recipes that you might want to consider adding to your Thanksgiving menu.

Do you use eguides or holiday guides to pick out gifts and prepare for the holidays?

0 comments:

Monday, November 12, 2012

I Wanna See Your Peacock {Home DIY}

Have you heard the Katy Perry song, "Peacock”?

She’s so not talking about peacocks, y’all. Ohmygosh it’s scandalous.

And would have made a great song in Magic Mike

Yup.

But I’m not here to chat about Channing Tatum’s amazing bod in that movie nor about Katy Perry songs.

On Pinterest, the peacock colored wall trend is huge. Everyone who is anyone has a wall in their home with that color, and it looks fab and chic. Yet much like most trends these days, if I try them on myself, I look like a sausage stuffed into skinny jeggings.

No business. Just no business.

So, I gathered up my inspirational photos and narrowed down my peacock-teal paint colors to Plumage from the now defunct Martha Stewart line and Deep Sea Dive by Sherwin Williams.

I wanted the result to look as bright, yet bold and deep as they do in the photos below.

Via Teal & Lime

Via Young House Love

I got Plumage color matched at Sherwin Williams + I had a sample of Deep Sea Dive in the garage. The result on my master bedroom accent wall was atrocious.

See?

Plumage. Onto Deep Sea Dive by Sherwin Williams.

Meh.

I finally just caved and realized that dark, deep, bold colors were NOT going to work in my master bedroom space.  And that’s because one whole wall is a set of sliding glass doors with plenty o’ natural light beaming in.

Sigh. I guess I’ll just have to bring in the color with bold accessories and a variety of textures.

So, what did I do with that accent wall? Well, what the other half of people on Pinterest are doing…stripes.

Forgive the awful quality of all these photos…they’re Instagrams. They look so wonderful on my phone though. Hmph.

That brings me to my next conundrum… accent colors.

I want our master bedroom to be chic, boutique hotel like (that quirky, unique, curated vibe) yet restful and easy to maintain. I don’t want 80 billion pillows that will get thrown on the floor every night.

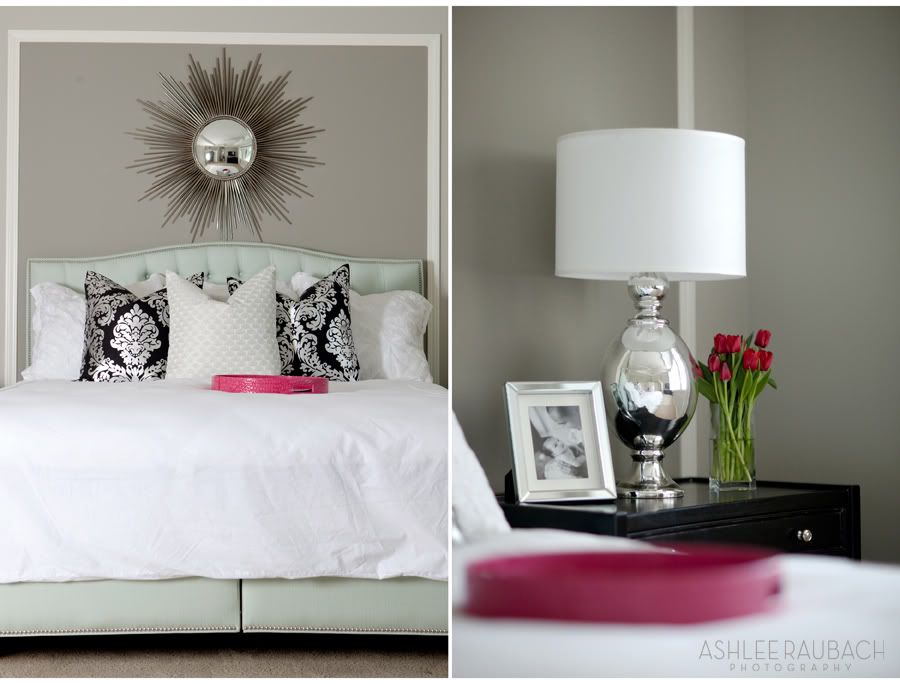
After much, much thinking, I am 99% sure I want the overall color palette to be a combo of these 2 pics:

Via Sarah Gordon Home

Via Ashlee Raubach Photography (Those lamps are TO DIE FOR!)

The main colors in both photos are: teal, white, hot pink, silver, and gold. I’d also throw in some black for a dash of drama. Our tall tufted headboard will be the star of the show along with a BIG damask rug I snagged from Overstock last week. I’ve got the 2 leads in the master bedroom show, and now I need a whole supporting cast. It is so hard to find those perfect accessories to really bring a room together. While that is the most stressful part of it, it is also the most fun. My husband and I have no shame in scouting every single Home Goods, Marshalls, Ross or TJ Maxx in a city.

WE HAVE NO SHAME.

I’ve been on the prowl for an affordable version of the chrome lamp above, and I found a nearly identical lamp at One Kings Lane for $149. Each.

Gulp. Or you can pay even more for this nearly identical version.

Dimond D1426W Waverly Table Lamp, Chrome Plated Glass With White Shade

Or this one is kind of cool, too:

Only $65 from Amazon.

But I also did find a STEAL of a deal on a pair of damask pillows, $36 for both, with free shipping.

These nightstands I made over earlier this year will get made over again, or I may just splurge on mirrored nightstands.

Nightstand22

Or I could turn them into peacock colored nightstands with a high gloss/lacquer finish? I can never achieve quite the look I am going for sometimes. Must keep trying.

What do you think? I have taupe walls with stripes, dark cherry handscraped floors, and a bright white popcorn free ceiling (more on that soon)…

What now?

0 comments: