Showing posts with label glue dots. Show all posts

Monday, October 1, 2012

Metallic Gourds Fall Wreath {DIY Tutorial}

Fall is here!

Well, officially it is. Unofficially, it is still sweat your arse off kinda hot down here in South Texas.

Nonetheless, I decided to make a pretty wreath for my dining room area. It was relatively inexpensive and it’s pretty easy to make. Like usual, I had to incorporate my love of metallics into my wreath.

MetallicGourdWreath

You’ll need some common craft supplies to whip up this wreath. I’m usually strictly a pumpkin kinda gal, but this year the gourds caught my attention. Ok, to be perfectly honest, I had no choice because that’s what came in the little bags from Dollar Tree: 1 pumpkin + gourds.

MetallicGourdWreath3

I bought 4 packages, but for this wreath you’ll only need 1 pack.

Supplies:

-1 pack of gourds from Dollar Tree

-1 Grapevine Wreath ($4 at Walmart currently)

-About 2 yards of mesh ribbon (I got mine at Hobby Lobby for 40% off, $4)

-Some pearly twig thingies (~$1 each at Hobby Lobby)

-Decorative fall leaves (~$1 for a pack of 12 at Hobby Lobby)

-Paint (primer + craft paint colors of your choice)

-Hot glue

-Scissors

-1 yard of burlap or ribbon to hang the wreath

-Glue Dots

-Floral Wire

-Paint brushes/foam brushes

-Knife

Total Cost: About $10-$15 depending on what you have on hand

MetallicGourdWreath2

First I took my wreath, and I wrapped the deco mesh all around it. I wanted to give the wreath some pizazz while still retaining the rustic look of the grapevine wreath.

MetallicGourdWreath4

MetallicGourdWreath5

Then I used some of my trusty 97-cents a can flat white spray paint to prime my Dollar Tree gourds. Note, I primed all of mine because I am using the leftovers as vase filler for my fall mantle. :)

MetallicGourdWreath6

Once your gourds are dry, go ahead and paint them with 2 coats of your favorite craft paint. For my wreath, I used Martha Stewart Craft Paint in Rust, Gold and Sterling. For all my craft projects, I used to use foam brushes, but they didn’t really wash well for repeated use, so I am happy I invested in a set of Martha Stewart paint brushes. I’ve used them on walls, furniture, crafts, jewelry, etc. and they wash so easily with warm soapy water. They still look brand new. Love them, well worth the modest price. I’ve never had an issue with anything from the Martha Stewart crafts line from Plaid.

While my paint was drying, I placed my pearly twigs onto the wreath. I secured the small stems down with some basic 97-cent floral wire from Walmart since the pearls didn’t exactly lay flat. Then I curved the stems to the shape of the wreath.

MetallicGourdWreath7

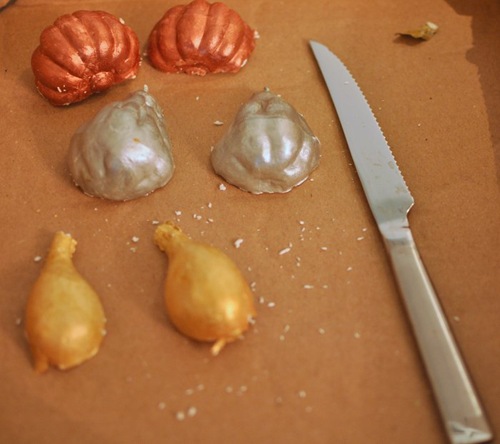
I checked if my gourds were totally dry, and I sliced them in half with a knife. Literally, a knife from my kitchen. The gourds are foam, so it didn’t take much effort at all.
MetallicGourdWreath8

I hot glued them onto the wreath and filled in any gaps with my glitter leaves from Hobby Lobby.

MetallicGourdWreath9

Using some spare burlap I had on hand, I cut a section of about 5” x 30” to create a way to hang the wreath in my dining room. Three thumbtacks hold the wreath up (and are covered by the burlap). To make the little fold in the burlap, I rolled the end up and in and secured with my super heavy duty Glue Dots. I adore Glue Dots. I embellished with a pair of leaves and was done!

MetallicGourdWreath10

MetallicGourdWreath11

MetallicGourdWreath12

My favorite part of this wreath is the contrast in the metallic colors and the mesh ribbon and pearls. Feast for the eyes.

MetallicGourdWreath13

And also, the burlap gives it a hint of country chic amidst all the high impact metallics and pearls.
MetallicGourdWreath14

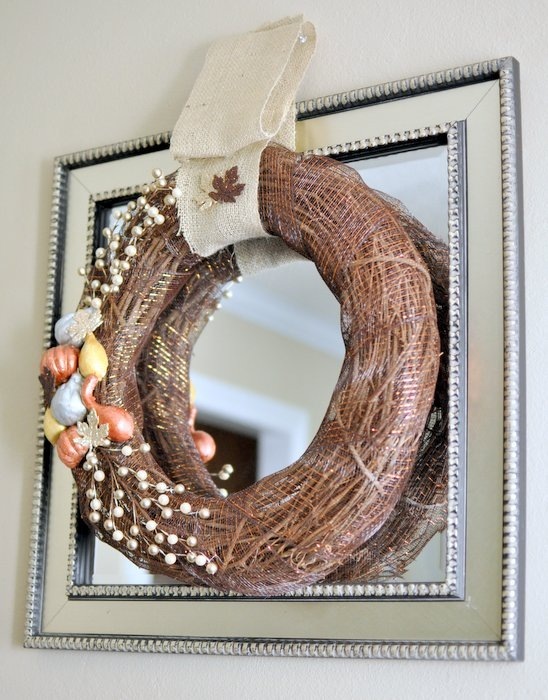
It was just too darn pretty to hang on my front door. Now I get to gaze at my creation as I blog. Squee. I guess I should mention that I didn’t officially affix the mesh ribbon to the wreath. I wrapped it around, but I didn’t hot glue it onto the grapevine, so at the end of the season, I could feasibly unwrap the wreath and re-use. I do that a lot with wreaths because I hate to end up with 6 wreaths at the end of the holidays. Now I have a prop box of stuff for wreaths. I did hot glue the gourds, but I use a low-temp glue gun, so it usually means I can peel it off if I want to. Just a tip that can save you money on décor + help out if you don’t have a ton of storage for wreaths—figure out a way to make the accents stick while you have it on display, but not in a permanent way.

Again, Glue Dots y’all. Seriously.

I love my fall wreath! Last year I didn’t make one and opted for a Halloween wreath, but this year I am opposite. I want to just decorate for fall and enjoy it all the way until Black Friday when it all gets put away in favor of Christmas décor. I do love Halloween though. How do you all decorate for both fall and Halloween?

Monday, October 17, 2011

Spider Web Votive Covers {DIY Tutorial}

I remember when I posted my first Halloween tutorial on August 31st, I thought I was nuts.

Now today it’s October 16th, and I only have a foyer vignette, candy corn centerpiece, Illuminated wreath and porch done. No Halloween mantle anywhere to be found.

Oops.

So, now it’s time to get to creating an awesome Halloween mantle using stuff I have already. As you all know by now, I love to decorate with candles, so today I have another tutorial on how to create some spider web votive covers using the Silhouette SD + black cardstock + Glue Dots®.

SpiderWebVotives11

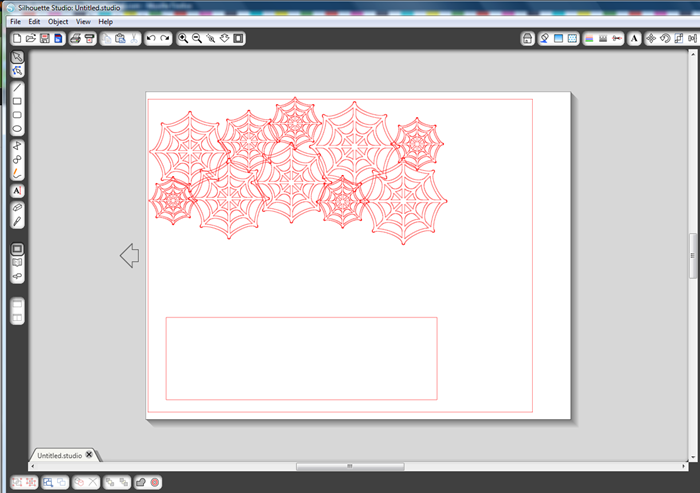
Open your Silhouette SD studio, and go to My Library and open up your free spider web. The spider web I used comes free with the 50 images/files that come loaded with the software. Layer a bunch together so that you roughly have a 2x7 inch area covered. I resized my webs a bit, as you can see below, so that it would look a bit more natural. Also, I created a 2x7 rectangle so I could have a visual, plus you’ll need it in a bit.

image

Next use your mouse to form a rectangle around all your webs.

image

Right click and click “Weld”. This makes all your webs connected as one giant web.

image

Next we want to move our welded web onto the 2x7 rectangle. Once you have it situated, go to Object > Modify > Intersect.

image

This will get rid of all the web outside the 2x7 inch box leaving you with a perfect votive wrap. I then copied & pasted the web so that I had 3 on my page. Time to send it to the Silhouette to cut.

image

Now, here’s the point where you want to find something to do for about 10 minutes while your Silhouette cuts. And cuts some more. Then when you think it’s done IT WILL CUT SOME MORE.

SpiderWebVotives02

What I did during this time is gather my votive holders + adhesive.

SpiderWebVotives01

SpiderWebVotives03 SpiderWebVotives10

You can find the Glue Dots® I used here (removable) and here (micro).

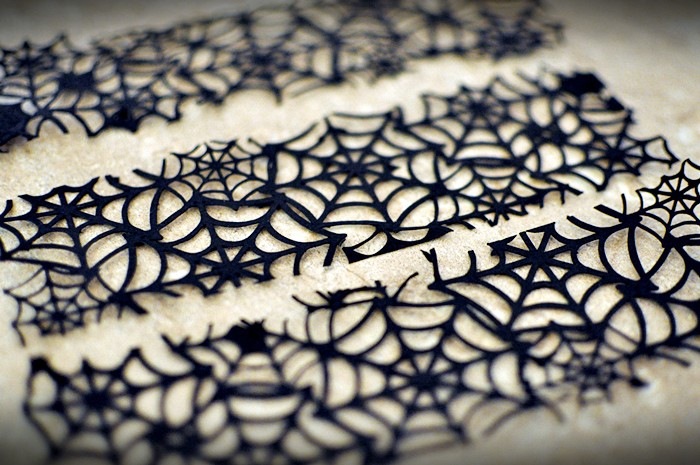
Once your Silhouette finishes cutting, you will notice you have a lot of little pieces to fish out of the design. This will be a little tedious, and you will want to quit. Don’t. I used the back of an earring to quickly punch out all the random pieces of cardstock that didn’t end up on the mat. Which honestly, would have been worse since peeling a billion little pieces of cardstock off a sticky mat is not my idea of a good time. Call me crazy.

SpiderWebVotives04

After all that work and effort, you are rewarded with 3 fabulous spider webs.

SpiderWebVotives05

Grab your removable Glue Dots® & 1 votive holder. I placed one Glue Dot in the center of the glass and I used one more to adhere the ends, as seen below:

SpiderWebVotives06

SpiderWebVotives07

And then you have your votive covers. You’ll notice some random ends/web pieces sticking out…not to worry, that’s what the Micro Glue Dots® are for. One of these itty bitty dots, and you’ll be squared away.

SpiderWebVotives09

SpiderWebVotives08

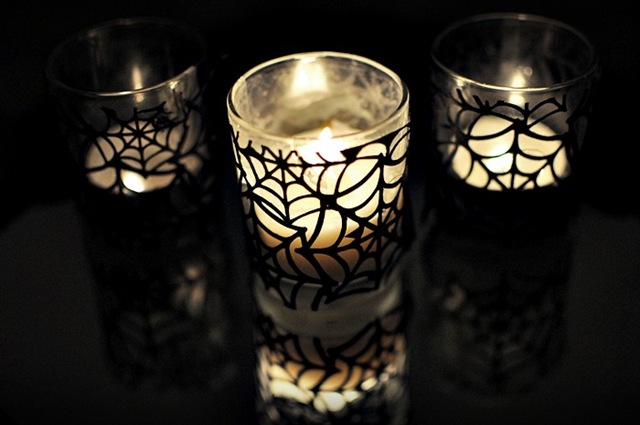
I then decided to see how they’d look once the candles are lit, and I fell in love.

SpiderWebVotives12

SpiderWebVotives14

SpiderWebVotives13

Ta-dah!

There you have it- a small part of my Halloween mantle. I hope to work on some more this evening, and hopefully have a full post up for you on Tuesday or Wednesday of this week. I am still a little stumped as to what to do. Do you have a link to an awesome Halloween mantle you’ve seen lately? Are you the type of person that creates mantle-scapes for every holiday/season?

image

I wrote this blog post while participating on the Glue Dots design team; hope you enjoyed my project as a Glue Dots Dottess.

Monday, October 3, 2011

Halloween Paper Lanterns {DIY Tutorial}

Today, we’re going to make some easy, versatile and cute Halloween lanterns for a tablescape, party décor or even a nice foyer vignette (which is what I used my lanterns for).

DSC_2072

Supplies:

  • 2 pieces of white cardstock
  • 1 piece of black cardstock
  • Glue Dots® craft dots, mini dots and removable dots
  • Silhouette SD or scissors, x-acto knife and perforator
  • 3 battery operated tealights
  • Printer (black/white only is fine)
  • Halloween confetti (optional)
  • Accessories such as a tray/creepy cloth/pumpkins/etc. (if desired)

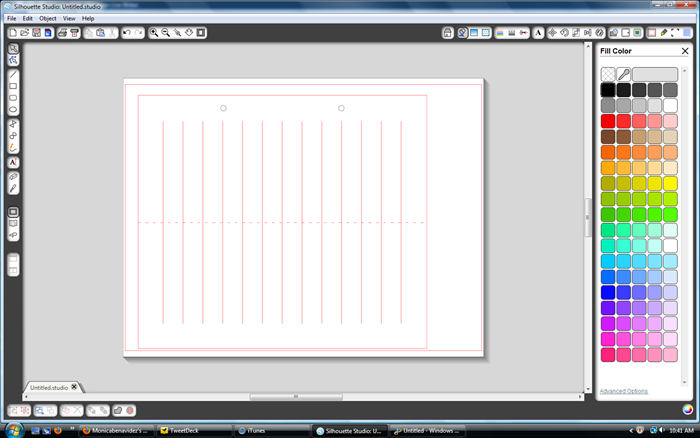
To begin, I laid out my lantern file in Silhouette Studio. I made it fairly large, since this would be the tallest of the lanterns.

image

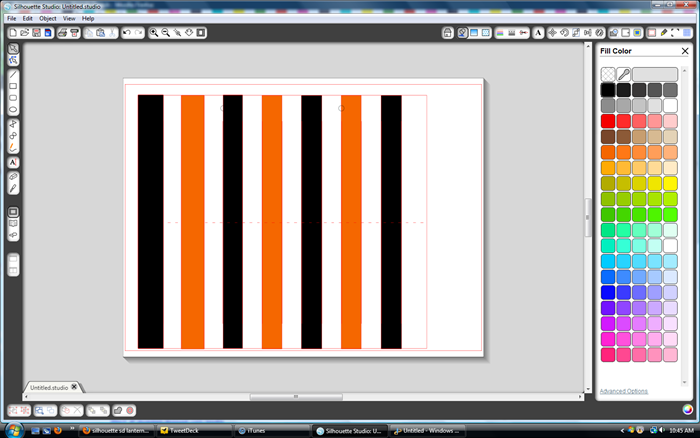
Using Silhouette’s print & cut feature, I wanted to add in some stripes to make it a bit more Halloween-ish. I made a rectangle over one of the stripes.

image

Then I filled it with black.

image

Then I copied/pasted the rectangle into every other stripe of the lantern.

image

Until I ended up with this. Remember to move all the stripes to the back (right click, send to back) and then adjust the height/width to fit within the stripe/cut area.

image

Then I went to the cut menu, and I clicked on each of my black/orange stripes and made sure “No Cut” is selected so it won’t cut out my stripes. This would defeat the purpose.

image

In order to use the print/cut feature, you need to make sure you show/print registration marks like I did below.

image

Of course, then I remembered I don’t have color toner right now, so I made all the orange stripes gray by using the fill menu.

image

Next, it’s time to print my design. Since my lantern is landscape-oriented, I changed my page set-up to reflect that so it’ll print correctly. I send it to the printer, and then I load it onto my Silhouette on the thick-media carriage sheet and let it cut away. (Note: if you have trouble with the print & cut feature, this blog post is super HELPFUL. It’s what I used to learn.)

image

Finally, I end up with my lantern.

DSC_1991

You kind of have to work the lantern a bit to get it to get in shape. I folded down the center:

DSC_1996

Then added 3 craft Glue Dots to one of the ends to secure the lantern together. Then you smoosh it down (like my technical terms) to reveal your awesome lantern:

DSC_1995

DSC_2007

I repeated this process again using this spider web background and making the lantern slightly smaller than the last one.

DSC_2008

And again one last time using plain black paper. This was the smallest lantern, so I had to whip out my mini Glue Dots®.

DSC_2014

DSC_2021

As you can see, all the lanterns do have holes so they can be hung. I didn’t get rid of the holes (though it’s easy to just delete them in Silhouette Studio) just in case I do decide to hang them or something. I like options.

Once you have all your lanterns assembled, you might want to embellish them a bit. I had some glittery Halloween themed confetti on hand from Walmart that was perfect for this project.

DSC_2051

DSC_2036

DSC_2039

I also had a mirror I wanted to use for this décor project, but didn’t want to have to deal with peeling off adhesive residue, so thank goodness for removable Glue Dots®

DSC_2022

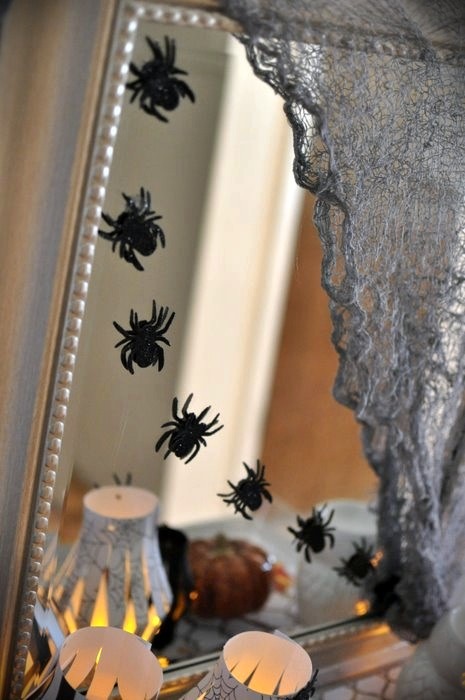
I used quite a few of these to create the spider marching line on my mirror.

DSC_2031

DSC_2055

DSC_2057

Finally, I had a low cost, creative and unique vignette for my foyer area.

DSC_2034

DSC_2067

DSC_2064

DSC_2084

I really like the way these turned! You could make a large batch of them and line a table with them for a party or even use them as luminaries outdoors. I’m all for affordable décor that is quick, easy and creative. I know using my Silhouette SD made it super easy, but you could make these with an x-acto knife, perforator and some scissors. Just use a ruler to make sure your lines are straight/even, and you could whip these up without needing a craft cutter.

Where would you use these lanterns? Do you have an idea for them that I missed? Let me know in the comments section.

image

I wrote this blog post while participating on the Glue Dots design team; hope you enjoyed my first project as a Glue Dots Dottess.