Showing posts with label kitchen. Show all posts

Thursday, October 10, 2013

#EnergytoBurn Peanut Butter French Toast {Recipe}

Peanut Butter Stuffed French Toast #Recipe #EnergytoBurn #spon

This post/recipe are part of a sponsored campaign in collaboration with Latina Bloggers Connect and The National Peanut Board.

I love when I get asked to create recipes—especially when they deal with a tasty, affordable treat that I eat almost daily…peanut butter! Peanuts and peanut butter are a great source of protein, and they give me energy to get through the day. A serving of peanuts has almost 7 grams of protein per serving, and I need protein to stay satiated and not eat a bunch of junk food.

I’m not kidding you when I say I literally have peanuts with me literally everywhere. I have peanut snacks in the car and peanut butter at work. You can put peanut butter on just about anything like oatmeal, muffins, crackers, celery, fruit. Or you can be like me and eat it straight off the spoon. I don’t judge! My 3 p.m. snack usually consists of a peanut butter and an apple. Growing up I had pan tostado (toast) slathered with peanut butter and strawberry jelly for breakfast or an after school snack. It was so delicious, and in honor of Hispanic Heritage Month, I revamped my pan tostado recipe to a more fun, sophisticated dish that still marries together all those tasty flavors.

Peanut Butter Stuffed French Toast #Recipe #EnergytoBurn #spon

My peanut butter stuffed French toast brings together creamy, salty, sweet peanut butter with strawberries, bananas, and thick Texas toast. The result is a quick, impressive dish that is sure to please the entire family. I love a hearty, gourmet Sunday breakfast, but I am also really busy and don’t like spending hours in the kitchen. This peanut butter infused breakfast packs fruit, protein, and decadence and is ready in under 20-25 minutes. Plus, it’s a cheap meal for a family of 4.

Peanut Butter Stuffed French Toast
MonicaWantsIt.com
Servings: 4

Ingredients:

  • 8 slices of Texas toast (thick sliced white bread)
  • 1/2 pint of sliced strawberries
  • 2 bananas, sliced
  • 2 eggs
  • 1 cup heavy cream
  • 2/3 cup milk
  • 1/4 tsp cinnamon
  • 2 tsp vanilla extract
  • 1/2 cup creamy peanut butter with honey
  • Dash of salt

Directions:

  1. Slice strawberries and bananas thinly. Keep them in a bowl until ready to top French toast.
  2. In a bowl, use a hand mixer to beat heavy cream until it forms soft peaks and you have whipped cream. Add in 1 tsp of vanilla extract + peanut butter and whip until it becomes peanut butter whipped cream. Resist all temptation to eat all the whipped peanut butter.
  3. Preheat a non-stick pan or griddle to get ready to cook French toast. (Medium heat works best)
  4. In a pie dish or shallow baking pan, whisk together eggs, milk, 1 tsp of vanilla extract, cinnamon, and salt. Soak slices of Texas toast in the mixture (make sure to soak each side). Cook on each side about 2-3 minutes, or until golden brown.
  5. Place one slice of French toast on a plate, top with a heaping tablespoon or 2 of peanut butter whipped cream, then place other slice of French toast on top. Top with a generous serving of strawberries and bananas, and dust with powdered sugar, if desired.
  6. Eat and enjoy!

Peanut Butter Stuffed French Toast #Recipe #EnergytoBurn #spon

Strawberries really go well with the peanut butter because they’re sweet and tart, but the real star of the show is this peanut butter whipped cream!

Peanut Butter Stuffed French Toast #Recipe #EnergytoBurn #spon

The peanut butter whipped cream becomes so light and fluffy, so it simply melts into a frothy delight all over the plate. It’s like peanut butter syrup!

Peanut Butter Stuffed French Toast #Recipe #EnergytoBurn #spon

Peanut Butter Stuffed French Toast #Recipe #EnergytoBurn #spon

Peanut Butter Stuffed French Toast #Recipe #EnergytoBurn #spon

I swear to you…it’s as AMAZEBALLS as it looks on here. And I have to thank my amiga Lindsey for coming over to help me create and taste test this dish! We couldn’t get enough.

Peanut Butter Stuffed French Toast #Recipe #EnergytoBurn #spon

I thank Latina Bloggers Connect and The National Peanut Board for choosing me for this awesome campaign. You can view more peanut butter info, recipes, and nutrition facts at http://bit.ly/19x0OOp.

What are your favorite snacks or treats that incorporate peanuts or peanut butter? Will you try out my recipe?

Tuesday, October 8, 2013

Tai Pei Review & BOGO Free Offer

Tai Pei Food Review

I got over my fear of Asian food thanks to this campaign from SocialMoms. I am usually not the type to seek out Asian style entrees, but I am trying to be more adventurous with my food choices, and I am also trying to not eat out at lunch as much. I got some coupons to try out Tai Pei entrees, and at only $2.18 each, they are a bargain lunch for the working woman (and man!).

My lunch hour consists of about a 5 minute drive home, so I like to maximize my 50 minutes at home by trying to prepare lunch in under 10 minutes. The Tai Pei entrees I tried are ready in about 6 minutes, plus 2 minutes of cooling time. So, in those 8 minutes, I wash dishes, let the dog out, check my email, and then I’m ready to enjoy my lunch. My fave was definitely the beef & broccoli.

Tai Pei Food Review

I loved that there are actual broccoli florets. and not just a bunch of stems. There was also a good amount of meat, but as always, I wish there was a tad more. The great thing is that you can just heat it up and eat—no plate required! I will note that you do not take off the plastic wrapper before you microwave it, so just a tip about that. My instinct was to remove the wrapper. The portion is great (not too much, not too little), and even my hubby loved the entrees. We both work at the same employer, so we come home for lunch together and Tai Pei Asian Foods provide quick, affordable, tasty meals for anyone that is on the go.

Tai Pei Food Review

I know a lot of my readers are calorie/portion conscious, and these entrees come in at under 450 calories, plus you can always add more veggies. The sodium is a smidge high, so drink lots of water when you have these meals. Overall, I highly recommend the Tai Pei line of foods, and you should check your local grocery store to see if they have the Asian Garden entrees which are geared a little more towards health conscious folks like me. They also have appetizers that look really good, too. I’ll definitely be adding Tai Pei meals to my lunch meal options.

If you’d like to give them a try, you can print out a buy one, get one free (BOGO Free) coupon right over here: http://bit.ly/1aLwKkF

You can also view all the Tai Pei line of food products at www.taipeifood.com

What are your favorite Asian/frozen meals? What do you do for quick lunches during the work week when you’re busy?

Tuesday, October 1, 2013

Open Faced Pot Roast Sandwich { Easy Meals}

Open Faced Pot Roast Sandwich Recipe #KraftRecipeMakers #shop #cbias

My husband and I are sort of thrilled I was chosen for this sponsored Collective Bias campaign with #KraftRecipeMakers because we are always so short on time and stressed from work to cook. Sometimes we come home to quickly eat dinner and then have to go back to work. I know…no fun!

We use that as a constant excuse to eat out, and it doesn’t do our waist lines and bank account any favors. The new Kraft Recipe Makers line (seen below) takes the guess work out of “What to make?” or “What’s a good, quick meal?” I loved how affordable the product was, and it’s definitely something I’ll be adding to my Walmart shopping list from now on. The meal starter kit was about $3, and there’s several recipes on the box to help you get inspired or creative. Overall, this recipe can feed a family of four for about $20. Try doing that at a restaurant!

Open Faced Pot Roast Sandwich Recipe #KraftRecipeMakers #shop #cbias

Personally, I like using meal helpers like this because they take the fuss out of a home cooked meal. I love, love, love pot roast, but I hate all the prep and stuff that can go with it. These open faced pot roast sandwiches are super easy, there’s literally under 15 minutes of prep, and it is delicious. My house smelled like heaven while this roast was cooking. Pairing simple, fresh ingredients with the Kraft Recipe Makers can make any night, even a tiresome weeknight, a special occasion. Quick, easy family meals don’t have to be a chore.

I made this as a crockpot recipe, because it’s super quick to get this going in the morning as I head out, and when I come home after work dinner is literally ready to be served. It simply doesn’t get any easier than that, folks.

The recipe is at the end of this blog post, but I do want to highlight a few things I did to put this recipe over the top.  I whipped out my trusty cast iron skillet to give my chuck roast a crispy, peppery crust. Any pan can work; I just happen to be kind of obsessed with my cast iron skillet right now.

Open Faced Pot Roast Sandwich Recipe #KraftRecipeMakers #shop #cbias

This herb sauce? Oh. Em. Gee. It’s so tasty, and it really brings out the savory, mouthwatering flavors of pot roast. Bravo, Kraft!

Open Faced Pot Roast Sandwich Recipe #KraftRecipeMakers #shop #cbias

When picking out a bread for your sandwiches, try to pick something like a garlic herb loaf. It’ll make your entire recipe/dish a bit more flavorful, and who doesn’t love tasty, crusty bread? Yum.

Open Faced Pot Roast Sandwich Recipe #KraftRecipeMakers #shop #cbias

And finally, it really is super simple to start with this…

Open Faced Pot Roast Sandwich Recipe #KraftRecipeMakers #shop #cbias

And end up with this. Yes, those are homemade mashed potatoes, and no it didn’t take me more than 10 minutes. Pinky promise!

Open Faced Pot Roast Sandwich Recipe #KraftRecipeMakers #shop #cbias

Open Faced Pot Roast Sandwiches
MonicaWantsIt.com
Servings: 4
Ingredients:

  • 1 Kraft Recipe Makers Kit (New England Pot Roast Kit)
  • 2.5 lbs. beef chuck roast
  • 1 bag of baby carrots (1 lb.)
  • 1 white onion, sliced
  • 16 oz. bag of microwaveable baby reds (found in produce section)
  • 1/2 stick of butter
  • 1/2 cup of milk
  • 2 oz. light cream cheese
  • Salt & Pepper
  • 1 loaf/8 slices of bread (I used garlic herb from Walmart)
  • Cheddar cheese, shredded

Directions:
  1. Sear your chuck roast in a cast iron skillet on both sides. Coat chuck roast with pepper before searing each side (no salt!).
  2. Throw your baby carrots, sliced onion, and chuck roast into a slow cooker/crockpot. Pour the Kraft Recipe Makers Classic Herb Simmer Sauce all over the roast. Set your slow cooker to cook on high for about 7-8 hours. A slightly larger roast will yield a longer cooking time.
  3. When there’s 15 minutes of cooking time left (or when you come home from work/shopping/etc.) pour the finishing sauce over the roast and allow to cook for 15 more minutes. In the meantime…
  4. Warm-up or lightly toast your slices of bread with some butter. I threw my slices in a 350 degree oven for about 7 minutes while I made the mashed potatoes.
  5. Throw your microwaveable baby reds in the microwave for 6-7 minutes. Once they’re cooked, toss in a bowl and mash with milk, cream cheese, butter, and salt/pepper to taste.
  6. Grab a plate, arrange 2 slices of bread, top with about 1/2 cup of mashed potatoes, and a hearty serving of pot roast. A dash of cheddar cheese adds gooey awesomeness.

That’s it! Maybe 10 minutes of prep before tossing it into the slow cooker, and maybe another 15 minutes to prep to serve and you have a tasty, semi-homemade meal that your entire family can quickly enjoy. And if you want to be extra fabulous, you can arrange your bread so that you end up with a heart shaped sandwich.

KraftRecipeMakers6

Awww. :)

Every bite is better than the previous one. I love the buttery bread, the creamy mashed potatoes, and the salty, savory pot roast in each bite. These sorts of recipes make me want to eat at home rather than eat out. Am I right?! Daniel and I could eat this once a week and not get bored. No more stress eating out for us!

You can find out more about the awesome products by Kraft Foods over on their Facebook page.

What are your favorite pot roast recipes? Do you enjoy cooking with a slow cooker in your home? Let’s talk about it in the comments section (please!)

Tuesday, September 24, 2013

Rustic Cast Iron Breakfast Pizza {Recipe}

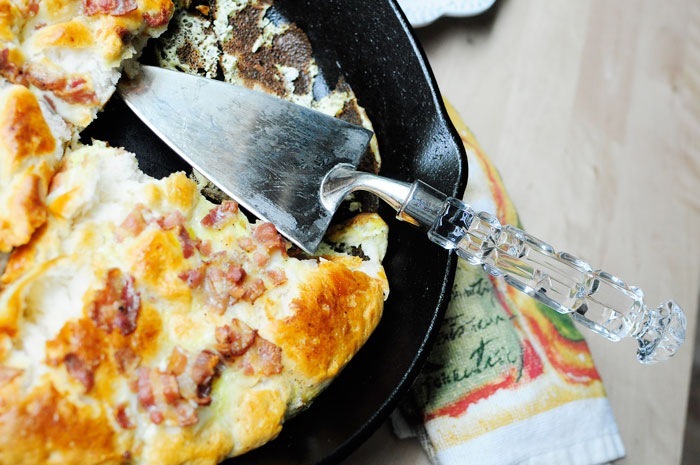
Rustic Cast Iron Breakfast Pizza Recipe: One dish meals from monicawantsit.com

Breakfast is my most favorite meal of the day, especially on weekends. As with all my cooking, I hate making anything that takes a long time and/or requires 5 different pots or pans.

No thank you.

Rustic Cast Iron Breakfast Pizza Recipe: One dish meals from monicawantsit.com

This dish is the anti-thesis to all of that. It’s all made in one cast iron skillet…and a small saucepan if you opt for gravy. It’s simple, delicious, filling and QUICK. You can have this from kitchen to table in under half an hour. I made this for Sunday breakfast, and then we ate the leftovers for Sunday lunch. This dish is perfect for brunch or breakfast, or heck, why not dinner? You likely have most of the ingredients on hand.

I use a cast iron skillet for this recipe because I am obsessed with the great crust and flavors that develop when cooking with cast iron. If you don’t have one, and don’t want to buy one, a 9x13 Pyrex dish will work, too.

Rustic Cast Iron Breakfast
MonicaWantsIt.com
Servings: 4-6

Ingredients:

  • 1 can of jumbo buttermilk biscuits (8 count)
  • 4 large eggs
  • 1/3 cup of milk
  • Salt/Pepper
  • 6 strips of cooked bacon
  • 1 tsbp butter

Gravy Ingredients:

  • 2 tbsp butter
  • 2 tbsp flour
  • 1 1/4 cup of milk
  • 1/2 cup shredded gruyere cheese
  • Salt/Pepper to taste
Pizza Directions:

Preheat oven to 425 degrees. Cook up 6 strips of bacon and drain excess fat onto paper towel. In a bowl, whisk together salt, pepper, milk and eggs until well mixed. Crumble the 6 strips of bacon into bite sized pieces and toss into egg mixture.

Open can of biscuits and form a crust on bottom of greased cast iron pan. Pour egg/bacon mixture over the biscuits and bake for about 15-17 minutes.

Cut into 4-6 servings using a pizza cutter and enjoy!

Gravy Directions:

Melt butter in small saucepan, add in flour to make a roux, then mix in milk. Bring up to a boil, whisking constantly. Reduce heat, add in cheese until melted, and add in salt and pepper to taste. I like my country gravy with a lot of pepper—I probably used 2 tbsp worth. The gruyere cheese adds a smoky flavor, but feel free to omit it or add in your fave cheese.

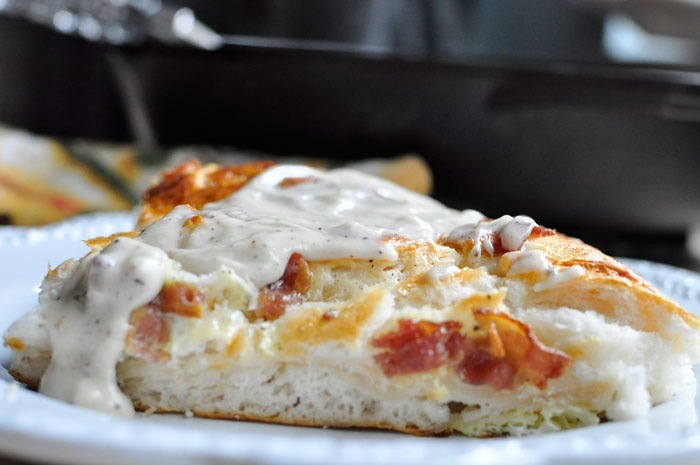
Rustic Cast Iron Breakfast Pizza Recipe: One dish meal from monicawantsit.com

The gravy adds a salty, decadent touch. Plus, who doesn’t like biscuits and gravy…WITH BACON?!

Rustic Cast Iron Breakfast Pizza Recipe: One dish meal from monicawantsit.com

It’s kind of funny how this totally does look like a pizza! The biscuits puff up and form a crust that is reminiscent of a pan pizza crust. Nom nom nom.

Rustic Cast Iron Breakfast Pizza Recipe: One dish meal from monicawantsit.com

You can really get creative with this recipe and use turkey bacon, or use pepperoni, or add in veggies like spinach and tomatoes. The possibilities are endless. This recipe is sure to please even the pickiest eaters, and I think it’d be fun for kiddos to eat.

What are your favorite Sunday morning foods?

Friday, June 14, 2013

Low Calorie Butter Cake Bars {Recipe}

At Walgreens, my husband and I are usually there for only one of 3 reasons.

1.) There’s a make-up sale. (Ok, that’s more me than my hubby.)

2.) We have a Redbox movie to return.

3.) Butter cake.

You see, Walgreens makes this delicious, pre-packaged butter cake that is irresistible. It’s flaky, sweet, buttery and about $1.29 each or you can buy 2 for $2.

Let’s face it…we buy 4.

Did I also mention my weight loss has sucked the past few months? Yeah. Wonder why.

Then I saw a recipe in Better Homes & Gardens’ May 2013 issue for gooey butter bars. They look JUST LIKE the morsels of awesomeness we love from Walgreens. Then I read the nutritional information- one 9x13 pan makes 24 bars for 209 calories each. Now, I’m no math whiz, but those would be some tiny squares. Even the cakes from Walgreens are like a 3x3” square for 220 calories.

So, I did what Monica does best. I found a way to lighten it up while still retaining that gooey, buttery, melt in your mouth flavor.

Low calorie butter cake bars via MonicaWantsIt.com

My recipe makes 15 decently sized squares for about 220 calories a piece (with strawberry topping), and you likely have all the ingredients at home already. To make it a bit more dessert-esque without a ton of calories, I made a strawberry topping for it. The end result is a buttery, flaky, shortbread like bar that is simple, sweet, tasty and perfect with a glass of iced tea. A southern treat for sure.

Here’s what you need (recipe adapted from Better Homes & Gardens’ May 2013 issue):

Crust:

  • 1/4 cup granulated sugar
  • 1.5 cups of flour
  • 1/2 cup of butter

Bars:

  • 2/3 cup softened butter
  • 1.25 cups of Splenda for baking
  • 1/4 light corn syrup
  • 1 egg
  • 1/2 tsp vanilla extract
  • 1 cup flour
  • 2/3 cup half and half

Strawberry Topping:

  • 8 oz of sliced strawberries
  • 1/4 cup of Splenda

Low calorie butter cake bars via MonicaWantsIt.com

Preheat your oven to 350 degrees. To make the crust, you combine the flour and sugar together. Then, using a pastry blender or your clean, dry hands, incorporate the butter until it’s all nice and finely crumbled together. Get a 9x13 pan lined with parchment paper, and pat your crust down.

Now for the bars, beat the softened butter with a hand mixer for about 30 seconds. Gradually add in the Splenda. Once that’s all mixed well, add in the corn syrup, egg, and vanilla extract. Alternately add in the flour and half and half and continue beating it all together. Your mixture may look a bit thick and curdled, which is ok. Carefully spoon the mixture over the crust and pop in the oven for about 30 minutes.

Low calorie butter cake bars via MonicaWantsIt.com

While that’s baking, put your sliced strawberries in a sauce pan with the Splenda. Simmer on medium until the strawberries and Splenda reduce to a nice topping consistency. If you like your sauce a little more saucey, add in about a tbsp of water. I chilled my topping in the freezer for about 15 minutes while my bars cooled.

Once your bars are cool, cut into 15 squares, top with some strawberries and enjoy!

Low calorie butter cake bars via MonicaWantsIt.com

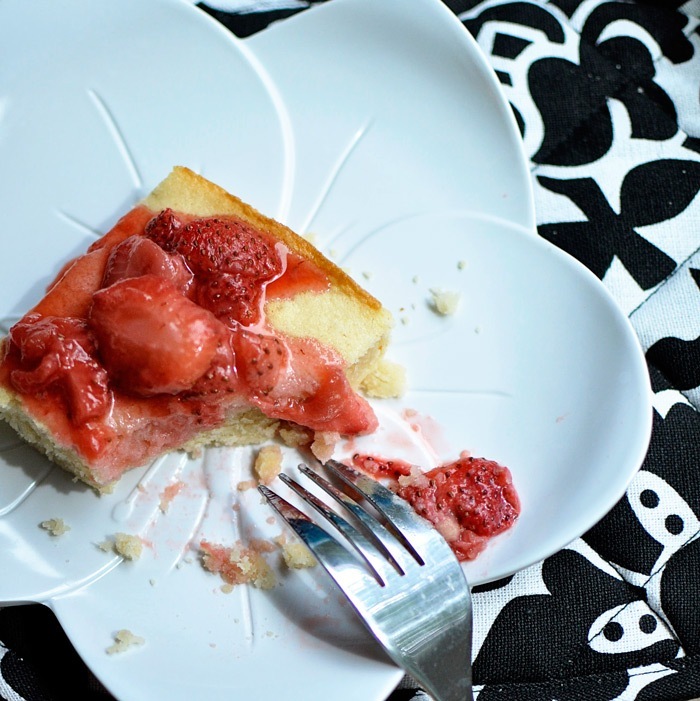
My favorite part about this is definitely the crust, but even more so, the topping! The sauce seeps into the butter bar and it’s heaven on a plate.

Low calorie butter cake bars via MonicaWantsIt.com

The flavor profiles are amazing. Butter, strawberries, and a flaky crust. Delish! Plus, by swapping some of the sugar for Splenda, we get to eat a bit more and save calories. I’m all for that.

Low calorie butter cake bars via MonicaWantsIt.com

Sigh. I can’t wait to whip up another batch of these. Who needs Walgreens, right?

This is a simple treat that is sure to please anyone. Maybe you’ll try it out this summer at a BBQ or something.

And while we’re cutting calories and trying to be healthy this summer, I thought I’d mention Diet To Go’s Summer Shape-Up sweepstakes on Facebook. You can enter to win one month of meals. You can read official rules right here. Good luck!

What’s your favorite summer treat?

Tuesday, January 15, 2013

Copycat Los Cucos Green Salsa {Recipe}

GreenSalsaRecipe

Ever been to a restaurant where the free stuff they give you before the meal is sometimes almost as good as the actual meal? Like for instance, the kick ass pretzel bread at Le Cellier at Disney World (Epcot) or the amazing salsa at your favorite Mexican restaurant?

Yes. And yes.

Daniel and I ate at Gringo’s probably about 6-7 years ago, and immediately became obsessed with their green/verde salsa. Was it avocado? Is it ranch? WHY IS IT SO GOOD?!

Fast forward to 2011 when he graduated from college, we had his celebratory dinner at Los Cucos which is a Houston-area restaurant chain, as is Gringo’s now. Again, that oh-so-delicious green salsa was served to us. It’s creamy, it’s got amazing flavor, and it’s easy to eat an entire little salsa bowl of it in under 10 minutes.

We seriously asked for a refill of the green salsa when we went to Gringo’s last month. We have no shame.

Since we can’t always travel to Houston for our Los Cucos/Gringo’s green salsa fix, we set out to recreate it at home. Not one to be stingy, I’m going to share the recipe with you. There are many variations of it online, but mine is slightly different in that I omit cilantro and mine is a bit creamier, less watery than a normal salsa. This recipe makes about 32 oz./4 cups, and is perfect for chips or top enchiladas/tacos. Very versatile salsa.

Ingredients:

  • 1, 28 oz. can of green tomatillos, drained (fresh can work, too, just boil until tomatillo flesh is tender, chill in freezer for to cool them off)
  • 3 medium avocados
  • 1/2 of a serrano pepper
  • 8 oz. light sour cream
  • 2 cloves of garlic
  • 2 tsp. salt
  • 1 tsp. steak or fajita seasoning

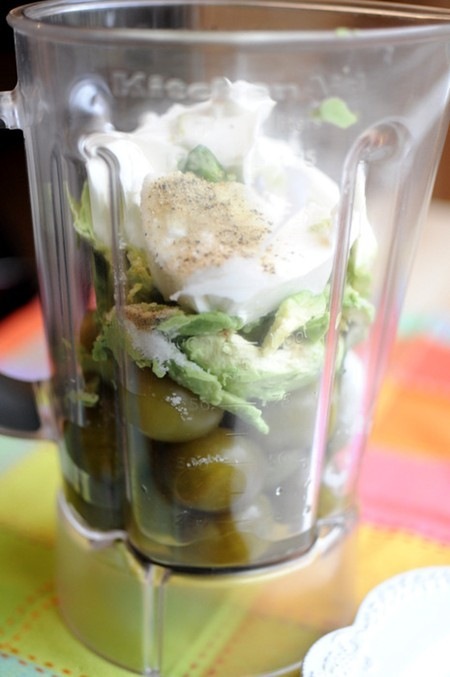
Directions: Open your can of tomatillos, drain all the liquid out. Dump all of them into the blender, followed by your avocado and all other ingredients. It should look like this:

GreenSalsaRecipe3

Not very pretty or fancy, but that’s ok. Now blend/puree until it’s all broken down. If it’s too thick for your liking, add a TINY amount of water. TINY!

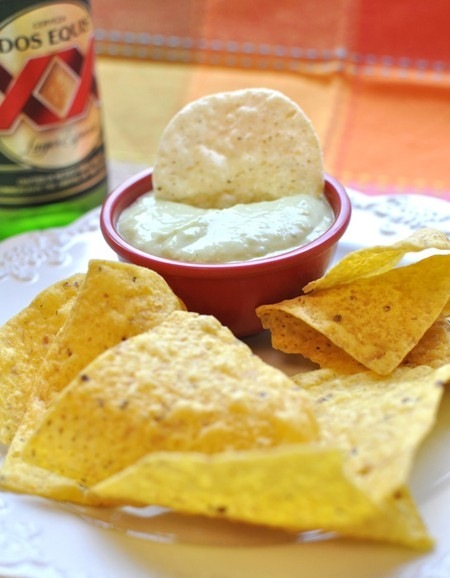
Now, serve and enjoy. This dip is creamy, full of flavor, and so fresh and affordable. Perfect for a Super Bowl party or any get together. It comes together in minutes. I thought it was tasty at room temperature, but it’s really delicious cold, too. The dip will keep for about 4-5 days, so I would make this and use it up quickly.

GreenSalsaRecipe5

As you all know, I’m counting calories like a madwoman, so I figured out the calories to be about 290 calories for 1 cup. I serve myself about 1/4 cup when eating, so it’s not too awful, but you gotta watch your serving sizes.

Are there any restaurant salsas you’re addicted to?

I’ll be back on Wednesday with a giveaway that will help the lucky winner keep their New Year’s Resolutions by snacking healthy. :) See ya then!

Monday, November 19, 2012

Thanksgiving Dishes with Country Crock {Recipe}


I adore Thanksgiving because it gives me an excuse to try new recipes. My favorite recipes to try out at Thanksgiving time usually revolve around 2 of my favorite dishes: potatoes and desserts.

For these recipes that I’m going to share with you today I was asked to swap butter and use a Unilever spread instead. I chose Country Crock, and I was super pleased with the results. You’ll also be happy to know that the recipes were tested on a 13-year old boy and a 30 year old guy and they both LOVED recipes.

Because they’re that good!

First up is a super easy potato side dish that is sure to please! The end result looks fancy, but I swear it doesn’t require a ton of effort.

Cheesy Hasselback Potatoes: Serves 4

Adapted from FoodNetwork.com

Ingredients:

  1. 4, 4-5 oz. potatoes (weight is before they’re peeled)
  2. 3 oz. of cheese (1.5 ounces per cheese type, grated) I used gruyere and white Vermont cheddar
  3. 1/2 cup of Country Crock Spread (melted)
  4. Salt/Pepper to Taste
  5. Bowl of water with dash of lemon juice

Steps:

1. Pre-heat your oven to 425-degrees. Rinse and peel potatoes, then soak in water with lemon juice. This keeps them from browning.

2. Once all your potatoes are peeled, thinly slice each potato about 3/4 of the way through in 1/4 inch slices like this:

I am so not a chef and my knife skills are not fab by any means, so just do your best!

3. Get your 1/2 cup of Country Crock Spread and melt it in a bowl large enough to fit your potatoes. I microwaved the Country Crock for about 30 seconds. Add a dash of salt and pepper and dunk each potato in the melted Country Crock mixture. Make sure all that yummy goodness gets into the potato layers. Reserve remaining melted Country Crock for later.

4. Pop your potatoes in the oven for about 35-40 minutes. Take them and sprinkle generously with your grated cheese and drizzle remaining melted Country Crock onto the tops of potatoes. Cook for another 15 minutes, or until fork tender and cooked all the way. Cool about 5 minutes, then serve! You end up with these wonderful potatoes that are slightly crispy on the outside, yet ooey and gooey on the inside.

So, now that you got your potatoes, you want dessert right? These 2-bite white chocolate pumpkin snickerdoodles will do the trick. Now I call these 2-bite snickerdoodles because they don’t flatten—they stay bon bon shaped! They’re dense, but have a lot of flavor and are great bite sized treats!

This recipe is also so easy that you can definitely get the kiddos involved. Look at the look of pure joy on my 13 year old brother’s face. Love that guy!

White Chocolate Pumpkin Snickerdoodle Bites: Makes 5-6 Dozen

Adapted from Six Sisters Stuff

Ingredients:

  1. 1/2 cup Country Crock Spread
  2. 1/2 cup shortening
  3. 1 cup white sugar
  4. 1/2 cup light brown sugar
  5. 3/4 cup unsweetened pumpkin puree
  6. 1 large egg
  7. 3 1/4 cup of flour
  8. 2 tsp of baking power
  9. 1 tsp of baking soda
  10. 1 cup white chocolate chips
  11. 1/2 tsp salt
  12. 1/2 tsp cinnamon
  13. 1/2 tsp of pumpkin pie spice

Topping:

  1. Cinnamon + sugar mixture (optional)

Steps:

1. Pre-heat your oven to 400 degrees. Mix together the margarine, shortening, sugars, pumpkin, and egg. I used my KitchenAid mixer, but you could also use your hand mixer or some elbow grease. Make sure to use a large bowl though because there’s lots of dough made from this recipe (which can easily be halved).

2. Once those ingredients are mixed, incorporate remaining ingredients (flour, baking powder, baking soda, salt, cinnamon, pumpkin pie spice, and white chocolate chips). REALLY mix it well! You don’t want to end up with cookies that have a flour aftertaste, so make sure to really work all the ingredients together well.

3. Put your dough in the freezer for about 10 minutes. This makes it easier to work with, especially if you’re using a cookie scoop, like I did.

4. Once your dough is chilled, use a cookie scoop or your hands to form into little balls. If desired, roll them into a cinnamon sugar mixture to coat. I did this on about half of my cookies, and I do think it helped amp up the flavor a bit, but you can omit this step.

5. Bake for about 8-10 minutes. They likely will not flatten, so don’t fret! Pumpkin puffs them up, but they’re still tasty. Unlike other cookies, I feel like these taste even better the day after. Once they’re out of the oven, let them cool and enjoy!

I didn’t taste or notice any difference when omitting the butter in favor of using Country Crock Spread by Unilever. It’s nice to know I can easily make that swap without sacrificing flavor. Now I know my Thanksgiving dinner will go off without a hitch!

What dishes could you use Country Crock Spread in this Thanksgiving?

Thank you to Good to Know & Unilever Spreads for being a sponsor. I was selected for this opportunity as a member of Clever Girls Collective. All opinions expressed here are my own.

Tuesday, October 23, 2012

DIY Kitchen Makeover {Reader Revamp}

This is a bit of something new on these pages. Ya see, sometimes I get emails from people and they’ve taken so much time and effort to write to me. It means so much. Especially when it’s something along the lines of, “Please help me not have an ugly kitchen!”

How can I say no?

Today we have Stephanie’s kitchen, and she emailed me about a month ago asking for some advice. So, I’m going to give her some ideas in this post, but I’m also hoping YOU will help her out. Sometimes a team of people can come up with way better ideas than one person.

Let’s help Stephanie! Here’s her email to me:

Dear Monica,

I LOVE your website and blog! Your tutorials are awesome. You have excellent taste! I have such a hard time imaging what the finished product with look like when I’m staring at ugly.

I’ve read your tutorial about staining your cabinets in your bathroom so many times. I’m really tempted to do this in my kitchen. I hate my kitchen, but I can’t afford to remodel it at this time. I was wondering if I could get your expert opinion on it. I’m sure you get bugged by people like me all the time, but I thought it might be worth a shot, because if you did reply, it would be awesome!

My appliances are black and the countertop is a very strange purple/grey color. I may just do a resurface kit for the countertops I found at Lowes or something. But can’t decide if the Java color of stain would look too dark on the cabinets next to the black fridge and oven or if I should do the Cherry color instead by General Finishes. I think I would add a tile backsplash and take off the two cupboards that have the ugly glass in them and just leave open shelves. Do you have any suggestions on color of the stain, tile, or paint?

I hope you are having a great day! Thank you for all of your tutorials that you put out there for us to read!

Thank you!!!

~Stephanie

And here are the photos she sent along:

Kitchen1

WindowAboveSink

So here’s my super cheap plan.

I would definitely stain the cabinets the espresso color (if you’re new here, I have the tutorial right over here). I think although the appliances are black, it’ll work.

Now personally, I love glass cabinets, so rather than take them off I’d add in some battery operated LED lights. I have these under my cabinets in my office, and I adore them. I’ve had them over a year, and the batteries still haven’t gone out. Adding in some light immediately classes up the glass and adds some nice interest. Rather than hop on a chair to turn them on, I just poke them with a ruler or pen.

Next, I’d swap out the hardware. It looks like you might have a standard 3” hole-to-hole opening, so it should make finding new hardware super duper easy. I’d recommend something modern in a satin nickel finish:

Amerock TEN26201-G10 Essential'z Collection Pull Arch Center to Center, Satin Nickel,3-Inch, 10-Pack

From Amazon, $24 for 10.

Or if you’re more traditional, maybe something more along these lines:

Amerock BP53030-G10 Mulholland 3-Inch Center Pull, Satin Nickel

From Amazon, $2.51 each.

In that open wall area near the window, I might add some glass shelving (or these nice stainless steel ones would work) for herbs/cute kitchen canisters/decor. Ooh, ooh…how about these floating Umbra shelves for cookbooks?

And maybe a fun menu chalkboard that would cover up the phone jack (get one of those canvas type ones that will just fit right over it). What might also look good is a simple roman shade on the window.

Unlike Stephanie, I don’t find her countertops particularly hideous, so I would probably leave them alone. I’ve seen a few people try those countertop makeover kits…and it looks like crap. Just my 2-cents, but if I were you, rather than spend $100 to paint them, I’d save up for some new solid surface countertops in 2013 if you hate them that much.

A few other things:

-I would move the coffee maker over to where the basket of stuff is. You could always get a mail/wall organizer to put on that wall to keep it off the countertops. This leaves the area to the left and right of your stove free for prep space.

-If you put shelving on the open wall to the left of the sink, you can move those plants onto it and keep that area free for pretty soap bottles. Also, a roman shade, even if left mostly open, could make the kitchen a ton more cheery and sophisticated. Oh and chic!

-Finally, if you do decide to stain your cabinets, I would recommend painting the walls just a faint, faint gray. Perhaps something like Silverpoint by Sherwin Williams. It’ll instantly cool, calm and elevate your kitchen from drab oak to tall, dark and handsome espresso.

Total cost for my plan:

-$100ish for staining supplies

-$60ish for new pulls

-$30 for paint (walls)

-$10 for lights

-$150 for misc. accessories (shelves, décor, etc.)

-$50 for supplies (paint rollers, tarps, etc.)

Total: $350-$400

Total Time Commitment: 3 weekends, max

What would you tell Stephanie to do to her kitchen? I think her space is lovely and with just a few small tweaks could be a STUNNING kitchen. Help Stephanie out in the comments section with your advice or encouragement.

Have a reader revamp you’d love my help with? Email me with the subject line “Reader Revamp Series” and briefly tell me how much I rock, how much your space sucks and a rough budget target plus about 3-5 photos. :)

Wednesday, September 26, 2012

Simply Delicious Spanish Rice {Recipe & Giveaway}

Mazola4

Spanish rice is a tasty food I love as a side dish or as a filling addition to my burritos/wraps. Problem is I could never quite make rice as well as my grandma did. It’d be a bright orange/red color and it’d be so tasty. I finally whipped up some Spanish Rice that I think my grandma would be proud of. It has the vibrant color and yummy taste that hers had…but all in about 20 minutes!

I kind of don’t like using bouillon cubes because it never fails that it doesn’t totally dissolve in the food and someone ends up eating a block of it. That’s why when I was asked to create a recipe using the new Mazola® Sobrecitos® bouillon packets, I was thrilled that they completely dissolve without needing to massacre a cube.

Mazola_Packet_Chic_HiRes_022812

And 1 pouch=1 cube making it a fool proof, no need to measure when adding it to food.

The Mazola® Sobrecitos® bouillon packets come in a chicken and tomato flavor, so it’s easy to find a way to use them in soups, rice, beans or even taco night.

Now, let’s make some tasty rice!

Mazola1

Ingredients:

-1 Mazola® Sobrecitos® chicken flavor bouillon packet

-1 cup enriched rice

-1 tbsp of Mazola Corn Oil

-1 tsp of Sazón with Garlic and Onion

-2 cups of water

-Optional: Avocado for garnish

-Salt/pepper/cayenne to taste

First, heat your pan and add the Mazola Corn Oil in. Then, once that was nice and hot, I started browning my rice over medium-high heat. While that was cooking, I dissolved my bouillon packet into my water. A few turns with a spoon and it was all easily dissolved. I’m officially a convert to packet bouillon now! It’s convenient and saves this Latina lots of time and effort. I like cooking that involves no fuss.

Mazola2

After your rice is nice and golden in color, add in your bouillon water + Sazón. Let it come to a boil, then cover your pan and reduce the heat to medium, stirring occasionally until your rice is nice and fluffy. You’ll know when it’s done, trust me. It took about 15 minutes for my rice.

Mazola5

I served mine up with my beefy enchilada casserole and some sliced avocados on top. It was SO tasty. It had the authentic flavor I was seeking without much work. I got the pretty color by adding a dash of cayenne. It also adds a dash of spicy!

Mazola3

This recipe makes about 6-8, 1/2 cup servings. It’s the perfect amount for 2 people to end up with leftovers for the next day.

See? Yummy leftovers the next day. I love how Mexican food is always vibrant in color. Feast for the eyes and stomach.

Mazola6

If you’d like other recipe ideas, you can visit Mazola on their

Mazola Sobrecitos Logo

And to help you get started, I’m giving away a $25 Walmart giftcard AND some Mazola Sobrecitos!! YAY!!!

You can enter below using the Rafflecopter widget. You must be 18 and up, US only, closes on October 3, 2012 at 8 pm CST. Good luck!!

This is part of a sponsored campaign with Latina Mom Bloggers and Mazola® Sobrecitos®. However, all opinions expressed are my own.

a Rafflecopter giveaway